Cheapest Aquarium Substrate: The Honest Truth
9 min read · 2026-10-31
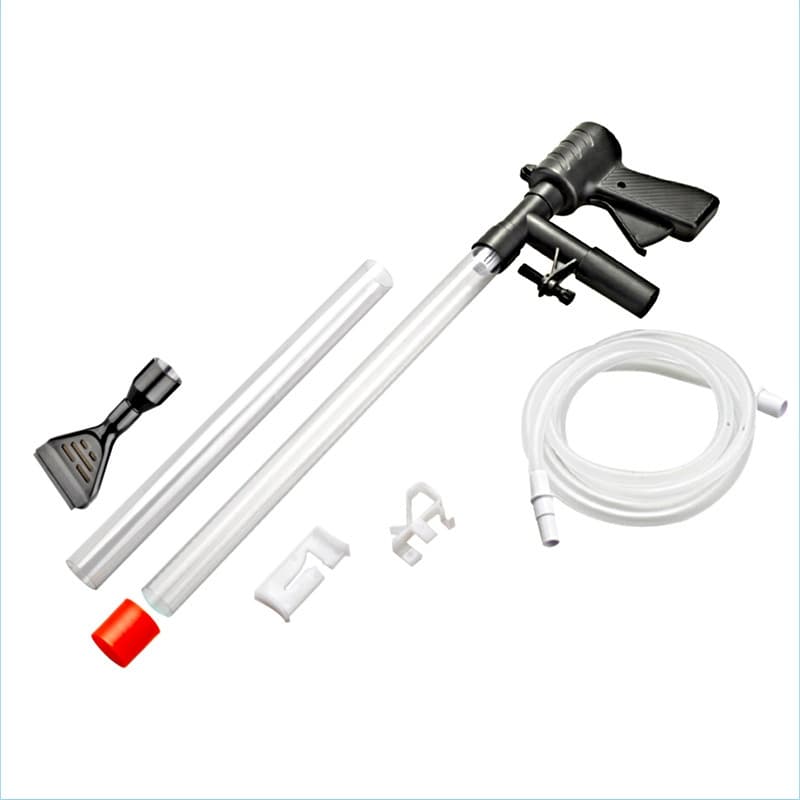
The gear this guide is about
Pneumatic Sand Washer & Water Changer
$12
The Blunt Truth About Cheap Aquarium Substrate
The cheapest aquarium substrate is typically inert sand or gravel you can source from hardware stores or landscape suppliers, not specialty aquarium stores. These materials are generally inexpensive to buy, but their long-term cost depends on your tank goals. If you want a thriving planted tank, these options might actually cost you more in the long run.
Most hobbyists want to save money, and substrate is one area where you can often make a smart budget choice. However, "cheap" isn't always good. You need to understand the trade-offs before you dump anything into your tank.
The True Cheapest Options: Sand and Gravel
When we talk about the absolute lowest upfront cost, we are looking at inert materials. These do not alter water chemistry or provide nutrients.
Play Sand
This is often the cheapest sand available. It is typically a very fine, light-colored sand. It works well for fish that like to sift through the substrate, like many corydoras species. The biggest hurdle with play sand is cleaning it. It's often very dusty and requires extensive rinsing before it goes into your tank. You will spend time, and a lot of water, getting it clean.
- Pros: Very low initial cost, good for bottom-dwelling fish, creates a natural look.
- Cons: Extremely dusty, requires significant rinsing, can compact over time, making it harder for some plants to root and potentially leading to anaerobic spots if too deep and undisturbed.
Pool Filter Sand
A step up from play sand in terms of cleanliness, pool filter sand is designed to be fine but uniform, and it's usually pre-washed to some extent. This means less rinsing for you. It's still an inert sand, so it won't buffer your water or feed your plants. The grain size is often slightly larger than play sand, which can be an advantage for preventing compaction.
- Pros: Low initial cost, less dusty than play sand, good for sifting fish, less prone to compaction than very fine sands.
- Cons: Still requires rinsing, inert, can look a bit unnatural with its uniform texture for some aquascapes.
Blasting Sand (Black Diamond Blasting Sand)
This is a popular choice for its dark color and low cost. It's actually a byproduct of coal slag. It's inert, so it won't affect water parameters. The dark color makes fish and plant colors pop. It's usually quite clean out of the bag, requiring less rinsing than play sand. Be careful to choose a fine grain size; coarser grades can be sharp.
- Pros: Very low initial cost, dark color enhances tank aesthetics, relatively clean, inert.
- Cons: Some batches can be sharp if the grain size is too large, requires rinsing to remove fines, inert.
Washed River Gravel
Another truly cheap option is basic washed river gravel, often sold in large bags at garden centers. It comes in various sizes and natural colors. Gravel is excellent for biological filtration because it provides ample surface area for beneficial bacteria. It's also easy to clean with a gravel vacuum. However, very fine plants can struggle to root in larger gravel.
- Pros: Very low initial cost, easy to clean, excellent for biological filtration, inert, allows good water flow through the substrate.
- Cons: Larger sizes can make planting difficult, can look less natural than sand in some setups, inert.
When "Cheap" Costs More: Planted Tank Substrates
If your goal is a heavily planted aquarium, especially with demanding plant species, simply buying the cheapest inert sand or gravel might not be the best long-term budget strategy. Here's why:
The Nutrient Deficit
Inert substrates provide no nutrition for your aquatic plants. Plants need macronutrients (like nitrogen, phosphorus, and potassium) and micronutrients (like iron, manganese, and boron) to grow. If your substrate provides none of these, you have two choices:
- Liquid Fertilizers: You will need to dose liquid fertilizers regularly into the water column. This is an ongoing expense. While a bottle might seem cheap initially, repeated purchases add up.
- Root Tabs: For plants that feed primarily through their roots, you will need to bury nutrient-rich root tabs into the substrate near their roots. These also need to be replaced every few months, another recurring cost.
Compare this to dedicated aquatic plant substrates, often called "aqua soils." These are usually clay-based granules packed with nutrients. They slowly release these nutrients over time, feeding your plants directly through their roots for many months, sometimes even a year or more. The upfront cost of an aqua soil is significantly higher than play sand, but you might save money on fertilizers and root tabs over time. More importantly, your plants will grow better, faster, and healthier, leading to a more visually appealing tank and less frustration.
Buffering Capacity
Some specialized plant substrates also have buffering capabilities, meaning they can help maintain a stable pH and carbonate hardness (KH) level that many aquatic plants prefer. Inert substrates do not offer this benefit, so you might need to use other methods to adjust and stabilize your water parameters, adding complexity and potentially cost.
Ease of Planting
Fine sands can be difficult for anchoring delicate plants, especially during the initial setup. Large gravel can make it hard for fine roots to get established. Specialized plant substrates are often granular, with a texture that is easy to plant in and holds plants securely. This saves time and reduces plant loss from floaters.
The Verdict: If you are planning a very lightly planted tank with only a few undemanding plants (like Anubias or Java Fern, which attach to hardscapes and feed mostly from the water column), cheap inert substrate is fine. For a dense, high-tech planted tank, consider the initial investment in a quality plant substrate. It often pays off in easier maintenance and better plant growth.
How to Prepare and Use Budget Substrates
Regardless of which cheap substrate you choose, proper preparation and use are critical to avoiding problems.
Rinsing is Non-Negotiable
You cannot skip this step. Dump your chosen sand or gravel into a clean bucket. Use a garden hose or tap to fill the bucket, stirring the substrate as you do. The water will be cloudy. Pour out the cloudy water, being careful not to lose too much substrate. Repeat this process many, many times until the water you pour off is completely clear. This can take a long time, especially with play sand. If you don't rinse thoroughly, your tank will be cloudy for days, stressing your fish and making a mess.
A Pneumatic Sand Washer & Water Changer can assist with substrate cleaning during maintenance, but the initial rinse is a manual effort.
Substrate Depth
For a general fish-only tank, a layer of a few centimeters deep is usually sufficient. This provides enough surface area for beneficial bacteria without becoming too deep. For planted tanks, you want a deeper layer, perhaps several centimeters more. This gives plant roots plenty of room to grow and helps prevent anaerobic pockets from forming by allowing some water circulation.
Layering (Optional, but Smart)
Some hobbyists choose to layer their substrate. A common method is to put a thin layer of a more nutrient-rich substrate (like a small amount of dedicated plant soil or even organic potting soil capped with gravel) at the very bottom, then cap it with several centimeters of inert sand or gravel. This provides some root nutrition without the higher cost of a full tank of specialized soil, and it prevents the messy soil from clouding the water. Make sure the cap layer is thick enough to prevent the lower layer from mixing into the water.
Maintenance
Even cheap substrates need maintenance. Gravel vacuums are your friend. For gravel, routinely vacuum the substrate to remove fish waste and detritus. For sand, hover the vacuum just above the sand to suck up debris without disturbing too much sand. Avoid digging deep into thick sand beds during every cleaning, as this can release trapped gases. Regular, gentle vacuuming is key.
- Tools like the USB Siphon Gravel Cleaner V2 or the 2-in-1 Gravel Cleaner & Siphon can make this task easier.
Common Mistakes That Turn Cheap Substrate Expensive
Choosing an inexpensive substrate can save you money, but only if you avoid these common pitfalls:
- Not Rinsing Enough: As mentioned, this is a huge mistake. A cloudy tank is frustrating, stressful for fish, and might require extra water changes, wasting water and your time.
- Buying the Wrong Type for Your Fish: Some fish, like kuhli loaches or certain cichlids, need fine sand to sift through or they can injure themselves on sharp or coarse gravel. Research your chosen livestock's substrate needs before buying. Replacing unsuitable substrate is a major hassle and expense.
- Buying Too Little: Underestimating how much substrate you need is common. A thin layer looks bad and doesn't provide enough space for biological filtration or plant roots. You end up having to buy more, potentially from a different batch, which might not match, or paying more for shipping if you order online. Always get a bit extra.
- Choosing Inert for High-Tech Plants: If you plan a heavily planted tank and buy inert substrate thinking you're saving money, you'll likely spend more on fertilizers and struggle with plant growth. The initial "saving" becomes a long-term drain on your wallet and patience.
- Ignoring Substrate Toxins: Never use construction sand, builder's gravel, or playground sand unless you are absolutely certain it is inert and free of chemicals, pesticides, or other additives. Some sands are treated with anti-bacterial agents or dyes. Stick to products clearly labeled as inert or suitable for play.
Calculating Your Substrate Needs Without Breaking the Bank
Estimating how much substrate you need is crucial for budgeting. You don't want to buy too much and waste money, but buying too little is worse. There isn't a universal "one size fits all" calculation with specific numbers because tank dimensions vary wildly. However, you can use a simple rule of thumb:
Most hobbyists aim for a substrate depth of at least a few centimeters across the bottom of the tank. For planted tanks, you might want a depth of several centimeters more to give roots ample room. Once you decide on your desired depth, you can visualize it in your tank.
Manufacturers often provide guidance on the coverage of their substrate bags. A large bag, perhaps around 20 kilograms, will usually cover a standard rectangular tank of medium size with a few centimeters of depth. For larger tanks, or if you want a significantly deeper substrate, you will likely need multiple bags. Always buy an extra bag if you are unsure; it's easier to return an unopened bag than to run out halfway through setup.
When buying in bulk from landscape suppliers, bring a sturdy bucket or two to measure. They often sell by weight or volume. Know how many liters or kilograms you need based on your tank's footprint and desired depth. For example, if you want a depth of about 5 centimeters in a medium tank, estimate the volume needed. Remember that sand is denser than gravel, so a bag of sand will weigh more for the same volume than a bag of gravel.
Focus on getting enough without overdoing it. Excessive substrate depth, especially with fine sand, can create dead spots that trap harmful gases. A moderate, well-maintained layer is always better than an unnecessarily deep one.
Quick answers
- What is the absolute cheapest substrate for an aquarium?
- Inert sand, such as play sand or pool filter sand, is typically the least expensive option per bag. Washed river gravel is also a very cheap alternative.
- Can I use cheap substrate for planted aquariums?
- Yes, you can use cheap, inert substrate for plants, but it will not provide any nutrients. You must plan to add liquid fertilizers or root tabs regularly, which is an ongoing cost.
- How much substrate do I need for my tank?
- A general rule is to aim for a layer of at least a few centimeters across the tank bottom. For planted tanks, a deeper layer, perhaps several centimeters more, allows plant roots to anchor and spread better.
- Do I need to wash cheap substrate before putting it in my tank?
- Yes, always. All new substrate, especially inexpensive sand and gravel not specifically marketed for aquariums, must be rinsed thoroughly until the water runs clear. This removes fine dust and debris that would cloud your water.