Set Up a CO2 System for Planted Aquariums
8 min read · 2026-11-06
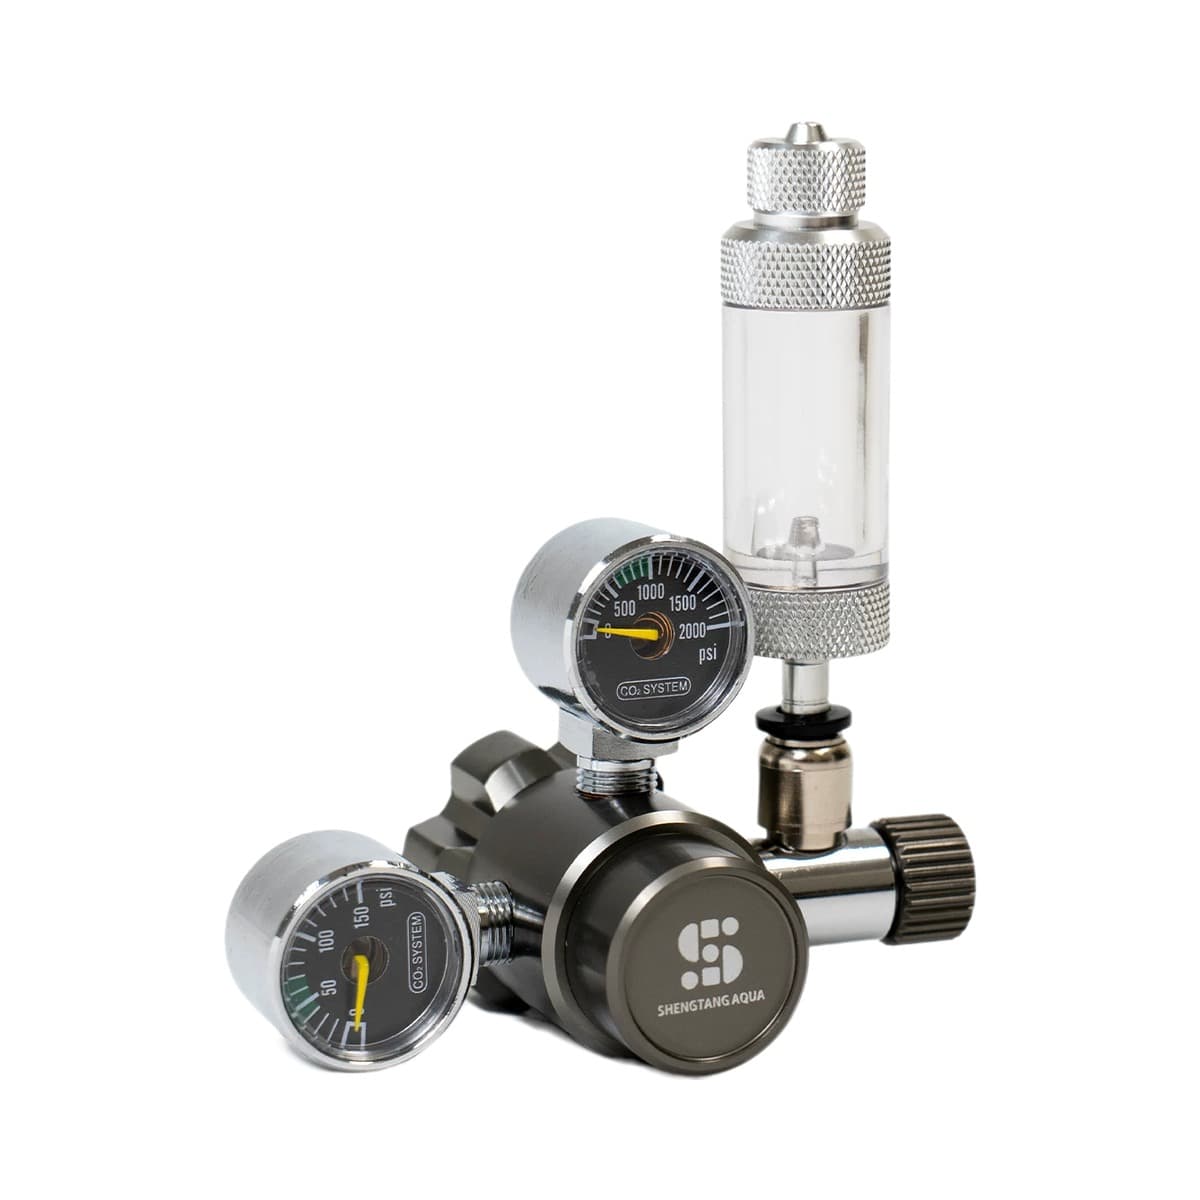
The gear this guide is about
Dual-Gauge Regulator + Solenoid
$66
Setting up a CO2 system is the single most effective way to boost plant growth in a freshwater aquarium. If your plants are struggling, adding CO2 often solves the problem. It provides a vital nutrient they need to thrive. Choose a pressurised CO2 system for precision and consistency. Or, go for a DIY CO2 generator if you want lower initial cost. Both options enrich your tank water with carbon dioxide, but they achieve it differently.
Why Your Planted Tank Needs CO2
Aquatic plants need carbon dioxide, water, and light. Photosynthesis relies on them. In most aquariums, CO2 limits plant growth, even with bright lighting. Tap water and fish respiration offer some CO2. But it's rarely enough for dense, healthy plant growth.
Enough CO2 means faster growth. Plants develop more vibrant colors. This strong growth fights algae, outcompeting it for nutrients. Many desirable aquatic plants won't reach full potential without supplemental CO2. Some may not even survive.
Choosing Your CO2 System: Pressurised vs. DIY
Your CO2 system choice impacts performance, maintenance, and overall cost. Pick what suits your needs and budget.
Pressurised CO2 Systems: The Professional Standard
Pressurised CO2 systems are the most common choice for serious hobbyists. They offer precise control over CO2 injection. This leads to stable levels and predictable plant growth. These systems consist of several key components:
- CO2 Cylinder: A refillable tank storing compressed CO2. You buy this separately and have it filled locally.
- Regulator: Reduces high cylinder pressure (over 800 PSI). It sets a safe working pressure, then fine-tunes CO2 output. A Dual-Gauge Regulator + Solenoid costs $65.95. It features both cylinder and working pressure gauges. The solenoid is an electronic valve. It allows automated on/off control with a timer. Buy a CO2 Solenoid Valve, 12V separately for $32.95 if your regulator lacks one.
- Bubble Counter: A clear chamber to visually monitor the CO2 injection rate (bubbles per second).
- Check Valve: Prevents aquarium water from siphoning back into your CO2 equipment. A Bubble Counter + Check Valve Set is $21.95 and includes both.
- Diffuser/Atomiser: Breaks CO2 into fine bubbles. This ensures efficient dissolution into the water. An Inline Atomiser Diffuser - 16/22mm costs $39.95. It connects to your filter's outflow. This ensures thorough mixing.
- Drop Checker: A glass device with a special 4dKH solution that indicates CO2 levels in the water by changing color. The Glass Drop Checker + 4dKH Solution is $18.95.
- Tubing: Specialized CO2-resistant tubing connects all components. Airline Tubing, 25 ft, priced at $11.95, has a 3/16" bore.
A good starting point is a bundle. The CO2 Starter Kit - Regulator, Diffuser & Checker costs $109.95. It requires a refillable CO2 cylinder, which is not included.
Pros of Pressurised CO2:
- Consistent and stable CO2 levels.
- Precise control over bubble rate.
- Solenoid allows automated on/off with lights.
- Less frequent maintenance (cylinder refills).
Cons of Pressurised CO2:
- Higher initial cost.
- Requires sourcing and refilling CO2 cylinders.
DIY CO2 Systems: The Budget Option
DIY CO2 generators produce CO2 through a chemical reaction. This usually involves yeast and sugar, or citric acid and baking soda. These systems are simpler. They have a lower upfront cost. This makes them attractive for smaller tanks or hobbyists on a tight budget.
The DIY CO2 Generator Kit, 2 L Stainless costs $65.95. This kit features a 2 L stainless steel bottle. Its valve body is tested to withstand pressures greater than 50 kg/cm². It offers a regulated output of 3 kg. An automatic safety release activates above 30 kg.
Pros of DIY CO2:
- Much lower initial investment.
- Easily available ingredients for refills.
- Simple to set up.
Cons of DIY CO2:
- Inconsistent CO2 output, fluctuating with temperature and reaction age.
- Requires frequent recharging (often weekly or bi-weekly).
- Less control over bubble rate.
- Cannot be easily turned off at night. This can lead to CO2 fluctuations and lower oxygen levels.
- Generally less suitable for larger tanks (over 20 gallons) or very demanding plants.
For most serious planted tank keepers, a pressurised system is worth the initial investment. It pays off in stability, control, and reduced maintenance. The DIY option is a cheaper, simpler call. It suits those just starting with smaller tanks or less demanding plants.
Step-by-Step Pressurised CO2 System Setup
Follow these steps carefully. You'll get a safe and effective CO2 installation.
1. Secure the CO2 Cylinder
Secure your CO2 cylinder. This prevents it from falling over. Use a sturdy stand, wall mount, or cylinder bracket. A falling cylinder can cause damage or injury.
2. Attach the Regulator
Carefully screw the regulator onto the CO2 cylinder valve. Hand-tighten firmly. Then use a wrench to tighten a bit further. Do not overtighten; it can damage the valve or regulator.
3. Assemble the CO2 Line
The order of components is important for safety and function:
- Regulator Output: Connect a length of CO2 tubing from the regulator's needle valve output.
- Solenoid (if separate): If your solenoid is a separate unit, connect tubing from the regulator to the solenoid's input.
- Bubble Counter: Connect tubing from the solenoid (or regulator) to the input of your Bubble Counter + Check Valve Set. Fill the bubble counter about two-thirds full with clean water.
- Check Valve: Install the check valve after the bubble counter and before the diffuser. Ensure the flow direction arrow points towards the aquarium. This protects your CO2 equipment. It stops water from siphoning back.
- Tubing to Diffuser: Run CO2 tubing from the check valve. It goes into your aquarium or to your inline atomiser.
Use the Airline Tubing, 25 ft. Cut it to the required lengths. Ensure all connections are snug. This prevents leaks.
4. Install the Diffuser/Atomiser
- Inline Atomiser: If using an Inline Atomiser Diffuser - 16/22mm, cut your filter's outflow tubing (16/22mm). Insert the atomiser. Secure with clamps if necessary. Ensure water flows in the correct direction.
- In-Tank Diffuser: Place the diffuser in your aquarium. Ideally, put it in an area with good water flow. Use a suction cup to secure it.
5. Place the Drop Checker
Prepare your Glass Drop Checker + 4dKH Solution. Add the supplied 4dKH reference solution. Mount it inside your aquarium with a suction cup. Place it in a visible location, not directly under the CO2 diffuser's bubbles. Give it at least 2-3 hours. This allows it to accurately reflect the tank's CO2 levels.
6. Leak Test Your System
Before turning on the CO2, double-check all connections. Spray a soapy water solution on them. See bubbles? You have a leak. Tighten or re-seal it.
7. Initial CO2 Activation and Adjustment
- Open Cylinder Valve: Slowly open the main valve on your CO2 cylinder. The cylinder pressure gauge on your regulator should show a reading.
- Adjust Working Pressure: Slowly turn the regulator's main adjustment knob. Set the working pressure. Start low, around 20-30 PSI.
- Open Needle Valve: Slowly open the needle valve on your regulator. Wait until you see bubbles in your bubble counter.
- Set Bubble Rate: Start with a low bubble rate. One bubble per second is good, especially for smaller tanks or if you're new to CO2. Increase the rate gradually over a few days. Monitor your drop checker and fish behavior. Always start too low rather than too high.
- Monitor Drop Checker: After setting your initial bubble rate, wait several hours. The drop checker solution needs to change color. Aim for a lime green color. If blue, increase the bubble rate. If it turns yellow, reduce the bubble rate immediately. Perform a water change if fish show distress.
8. Connect Solenoid to a Timer
Connect your regulator's solenoid to an aquarium timer. Set it to turn on CO2 one to two hours before your lights come on. Turn it off one hour before your lights go off. This ensures CO2 is available when plants photosynthesize. It also prevents dangerous CO2 buildup overnight.
Monitoring and Maintenance
Setting up your CO2 system is just the start. Ongoing monitoring and maintenance are crucial. They ensure a healthy, stable planted tank.
Daily Checks
- Drop Checker: Check the color daily. It should be consistent green. Adjust if blue (increase CO2) or yellow (decrease CO2).
- Bubble Counter: Confirm a consistent number of bubbles per second. Fluctuations can mean a regulator issue, or a leak.
- Fish Behavior: Observe your fish. Gasping at the surface, especially late in the day? CO2 levels might be too high. Increase surface agitation or reduce CO2 output.
- Plant Health: Look for "pearling." These are tiny oxygen bubbles forming on plant leaves. It's a good sign of active photosynthesis and sufficient CO2.
Weekly/Monthly Maintenance
- Cylinder Pressure: Watch the cylinder pressure gauge. Plan a refill when it drops significantly.
- Diffuser Cleaning: Algae and mineral deposits clog the ceramic disc. This reduces efficiency. Periodically clean it. Soak it in a bleach solution (rinse thoroughly, then soak in dechlorinator). Or use a dedicated diffuser cleaner.
- Tubing Inspection: Check your CO2 tubing for hardening, cracks, or wear. These can cause leaks. Replace as needed.
Common Mistakes to Avoid
Even experienced hobbyists make simple errors with CO2. Avoid these pitfalls:
- Not Using a Check Valve: This is a critical safety component. Without it, water can back-siphon into your regulator. This causes damage. It creates a hazardous situation. The Bubble Counter + Check Valve Set includes this for $21.95.
- Ignoring the Drop Checker: Bubble count is imprecise. The drop checker shows actual CO2 levels in the water. Use it.
- Too Much CO2 Too Quickly: Too much CO2 quickly lowers pH. It reduces oxygen. This stresses or kills fish. Always increase CO2 gradually over several days.
- Not Turning CO2 Off at Night: Plants only use CO2 during the light cycle. At night, they release CO2. If your CO2 system runs 24/7, CO2 levels build up overnight. This dangerously depletes oxygen. Always use a timer with your solenoid.
- Inconsistent Flow: A fluctuating bubble rate means inconsistent CO2 levels. This stresses plants and encourages algae. Ensure all connections are tight. Your regulator must function correctly.
- CO2 as a Magic Bullet: CO2 is vital. But it is not the only factor. Plants still need adequate lighting, proper fertilisation, and good water parameters to truly flourish.
Quick answers
- Why do planted tanks need CO2?
- CO2 is a crucial nutrient for aquatic plants, enabling stronger growth, better color, and helping suppress algae by promoting healthy plant competition.
- What are the main types of CO2 systems?
- The two main types are pressurised CO2 systems, offering consistent and precise control, and DIY CO2 generators, which are cheaper but less stable and more labor-intensive.
- How do I know if my CO2 levels are correct?
- Use a glass drop checker with 4dKH reference solution. The solution changes color based on CO2 levels: green is ideal, blue means too little, and yellow indicates too much.
- Is CO2 dangerous for fish?
- Too much CO2 can be harmful to fish. Always introduce CO2 gradually, monitor fish behavior closely, and use a drop checker to ensure levels remain safe. Turning CO2 off at night is crucial.